• Skip to primary navigation
  • Skip to main content

Thats Journal

  • Home
  • About
  • Digital Marketing
    • Affiliate Marketing
    • Branding
    • Content Marketing
    • Email Marketing
    • Marketing
    • Sales and Marketing
    • SEO
  • Social Media
  • Influencers
  • Resources
  • WordPress
    • WordPress Plugins
    • WordPress Themes
  • Sitemap
  • Contact Us
  • Show Search
Hide Search

How To Schedule Messages In Bulk in HootSuite Using CSV File

admin · Jul 25, 2014 · Leave a Comment

This post is a tutorial for bulk scheduling messages in HootSuite dashboard using a csv file. You can schedule multiple messages, posts and tweets in bulk in HootSuite with specified date and time. For scheduling messages in bulk, you must have a HootSuite Pro account or a HootSuite Enterprise account.

To schedule messages in bulk in HootSuite, follow the below given steps:

1) Create a csv file: You can use MS excel for creating a CSV file. Open a excel worksheet and add columns as given below:

i) First column: Add date and time in mm/dd/yyyy hh:mm or dd/mm/yyyy hh:mm format. I prefer mm/dd/yyyy hh:mm format. For Example, if I want to schedule a message for 06/01/2014 to be scheduled at 08:00 hours, then I will enter first column as: 06/01/2014 08:00

ii) Second column: Here you can add your message. You need to make sure that if you are scheduling in Twitter, then, you have a limit of 140 characters.

iii) Third column: Here you can add the URL.

Also, you need to make sure that,

a) You have to add one message per row. If you want to add another message, use the next row.

b) Posting time you are entering must end in a 0 or a 5. For Example, you can schedule a message for 08:30 and 08:35 but not 08:31.

c) Posting time must be a future time.

For Example, here I am scheduling five messages for June, 1st and June, 2nd, 2014 with different time.
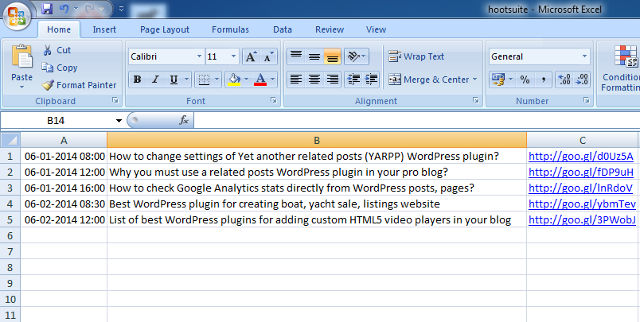
How to schedule messages in bulk in HootSuite using csv file

When you are saving the file, click on “Save as” and select “Save as type:” as CSV (Comma delimited).

2) Now, click on Publisher menu in HootSuite dashboard:
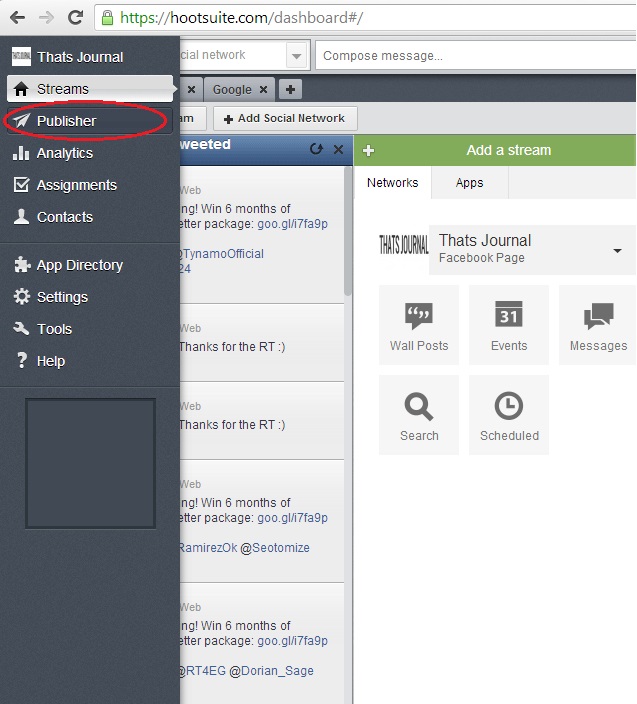
Click on Publisher menu in HootSuite dashboard

3) Then, click on Schedule in Bulk button.
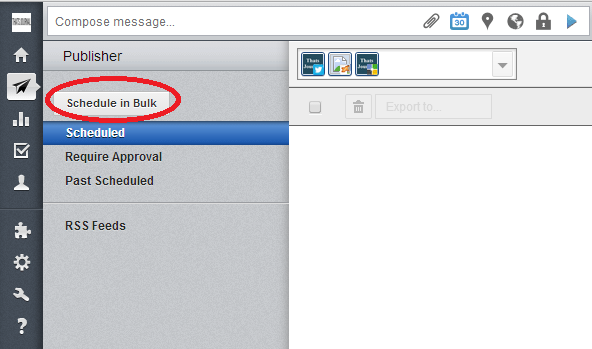
Click on Schedule in Bulk button in HootSuite

4) In Bulk Schedule Updates dialog box, choose file under “Upload csv file” and choose a date format. This date format must be the same which you used in your csv file. Under “Click to select a social network” drop down menu, select social networks for which you want to schedule messages. Here, I am selecting Twitter and Google+ social networks for scheduling my message. Click on “Submit”.
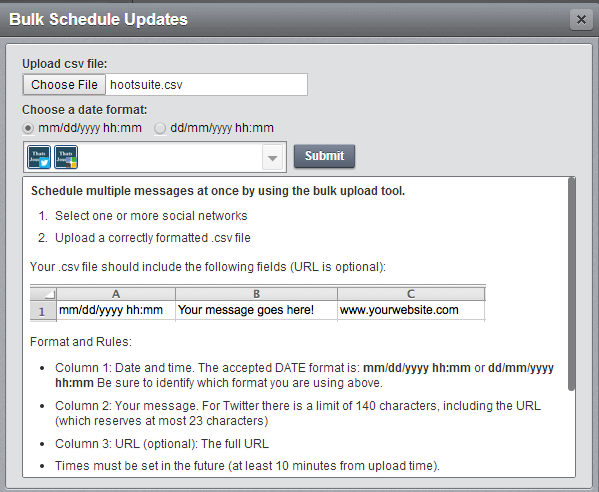
Bulk Schedule Updates dialog box in HootSuite

If you have done everything correctly, then you will get a message, Successfully scheduled n messages, where n is the number of messages you have scheduled.
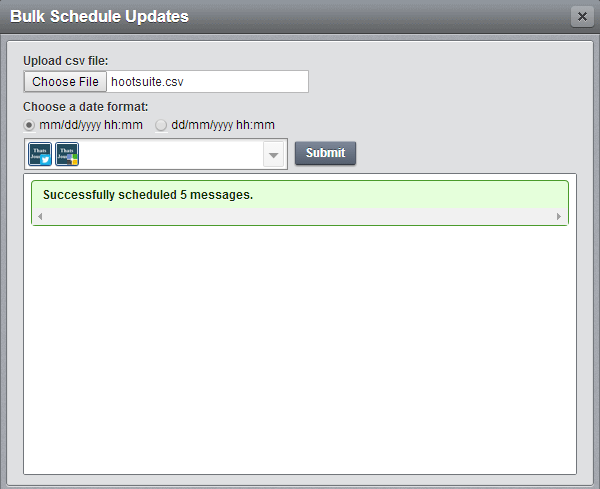
Successfully scheduled 5 messages in HootSuite

Now, you can go to the Publisher page to see your scheduled messages. You can also edit or delete the scheduled messages for each social network.

Bulk scheduled messages in HootSuite dashboard

Share this:

  • Click to share on Facebook (Opens in new window)
  • Click to share on Twitter (Opens in new window)
  • Click to share on LinkedIn (Opens in new window)
  • Click to share on Pinterest (Opens in new window)
  • More
  • Click to print (Opens in new window)
  • Click to share on Reddit (Opens in new window)
  • Click to share on Tumblr (Opens in new window)
  • Click to share on Pocket (Opens in new window)
  • Click to share on Telegram (Opens in new window)
  • Click to share on WhatsApp (Opens in new window)
  • Click to share on Skype (Opens in new window)

Related

Download thousands of Themes, Plugins & Graphics to create your Website. Use promo code ThatsJournal and get an additional 10% off for All MonsterONE Plans.

Social Media beginner's guide, bulk scheduling, business, campaign, date, delete, edit, format, management, multiple, networks, online, optimization, posts, publisher, services, social media marketing, software, strategy, time, tutorial, tweets, upload

About admin

Thanks for dropping by! This post was published by the Editorial Team of Thats Journal. Follow us on our social media channels for current trends on Digital Marketing, Social Media Marketing and WordPress Themes.

Disclosure: Thats Journal is supported by our readers. This page may contain affiliate links. That means, if you click on these links to make a purchase, we may earn a small commission (at no extra cost to you). These funds help us to keep this blog up and running.

Categories

Subscribe via Email

Enter your email address to subscribe to Thats Journal and receive new posts by email.

Join 38,252 other subscribers

Join Our Community of 50,000+ Bloggers And Authors!

Reader Interactions

Leave a Reply Cancel reply

Copyright © 2023 Thats Journal