Previously, I discussed on how you can apply the best settings in WP Super cache WordPress plugin. In this post, I will discuss on how you can use the Preload feature in WP Super cache to decrease the loading time of your blog further and to make your WordPress blog load even faster.
What is Preload?
Preload is a caching technology in WP Super cache where static files are created for posts, pages, tags, categories and other taxonomies. When a user or even a bot visits your blog then these static HTML files are served to them. Thus, it helps in decreasing the loading time of your blog posts and pages.
Advantages of Preload feature:
1) Faster loading of blog: As I explained earlier, preload mode creates static HTML files and thus it helps in loading a blog faster. You can check the page speed of your blog after you enable the preload feature and you will see the difference in loading time.
2) Helps in SEO: Since your blog loads faster, it will help your blog to rank better in search engines.
Disadvantages of Preload feature:
1) Resource intensive: Preload is a resource intensive feature and it works in the background. If you are using a shared web hosting account then, after you enable it, you should check it for some days on how it is working in your site.
2) More cache files: Preload mode creates more static files. If your blog has thousands of posts then, you might want to preload fewer files only.
To enable Preload feature in WP Super cache, follow the below given steps:
1) Login to your WordPress dashboard.
2) Then, go to: Settings –> WP Super cache.
3) Click on “Preload” tab.
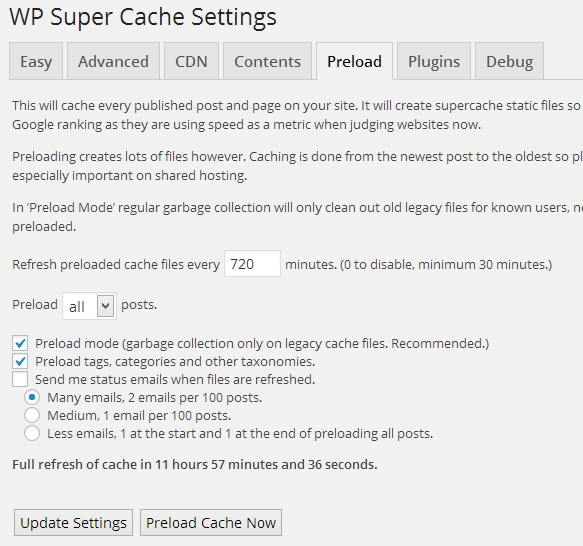
4) Under “Refresh preloaded cache files every” field enter a value which suits your blog. I have inserted the value 720. That means after every 12 hours, old preload cache files will be flushed and the new ones will be created. However, you can add any value here, say 2880 minutes (preload cache files will be refreshed every 2 days) depending on how your web host can handle this feature.
5) Under Preload drop down menu, select the number of posts you wish to preload. I have selected all posts, however, if your blog has thousands of posts, you might want to select a numeric value as per your needs. Posts will be counted from newest to oldest. For Example, if you select the value as 42 then only the first 42 posts will be preloaded.
6) Select option “Preload mode (garbage collection only on legacy cache files. Recommended.)”, and “Preload tags, categories and other taxonomies.”
7) Click on “Preload cache Now” and then, click on “Update Settings”.

I try these settings but my cache does not get renewed. Tried at 30mins for testing
Hi Paul, make sure you are following all the above given steps.
Hi Admin, Doing all except 5) Under Preload drop down menu
as i don’t have one,
You might want to check if WP Super cache is in its latest version. If it is, you can try disabling and re-enabling it again. Step 5 is required as it suggests which posts needs to be preloaded.
Ok Thanks.
Using Version 1.4.2 (believe latest) What i can see is my pages all preload (about 30 pages) They update but only if i login to site, is that how it works, i.e it won’t refresh cache without logging in? If so must be working. But i do not have option 5.
Yes, version 1.4.2 is the latest version. It looks like a WordPress cron job issue. WordPress cron jobs only work when someone visits your site in that duration. It usually happens in websites which get low traffic. You can set up a real cron job by using this plugin. I guess the drop down menu is not getting displayed since you have 30 posts. Here, it is displayed like:
Thank you
You are welcome!
Can i ask, is it normal to have in my super cache folder other folders from other sites. i.e my super cache folder has a folder mysite.com but also has a folder of ly.com is that normal
Not sure about it. For me, there’s just one folder in there: https://www.thatsjournal.com You can check the contents of the folder. If its not related to your site you can delete it.